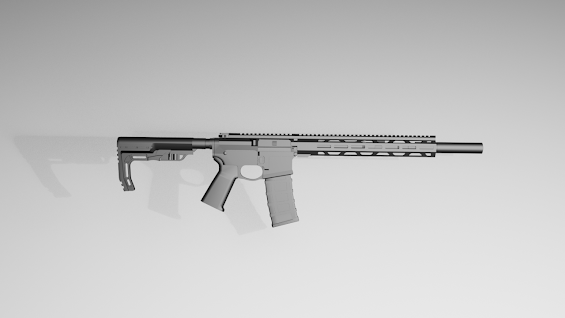
3D Modeling Project 1 :Hard Surface Modeling
Project 1 :Hard Surface Modeling
1. Preparation
1. Reference Collection
• Gather reference images of the weapon, including side views and detailed shots.
• Ensure you have accurate measurements or proportions to work with.
2. Blender Setup
• Open Blender and delete the default cube.
• Go to Scene Properties > Units, and set the units to “Metric” for precise modeling.
• Add reference images as background.
2. Basic Modeling
1. Create the Receiver (Main Body)
• Add a cube and scale it to match the general shape of the receiver.
• Enter Edit Mode and use tools like Loop Cut and Extrude to define the shape and add details.
2. Barrel
• Add a cylinder and adjust its radius and height to match the barrel dimensions.
• In Edit Mode, use Inset and Extrude to create grooves and openings.
3. Rail System
• Use a scaled cube for the base rail.
• Add Loop Cuts to define the holes along the rail and use Inset and Extrude for cutouts.
4. Grip
• Start with a cube, scale it to form the grip base.
• Adjust vertices in Edit Mode to create a curved, ergonomic shape.
• Add a Subdivision Surface Modifier for smoother edges.
5. Magazine
Add a cube, scale it into the magazine’s shape.
Use Bevel to round the edges slightly.
6. Stock
Combine cubes and cylinders to form the stock structure.
Use the Boolean Modifier to create internal cutouts and openings.
3. Adding Details
1. Boolean Operations
• Add additional cubes or cylinders as Boolean objects.
• Use the Boolean Modifier to cut or join parts of the model.
2. Topology Optimization
• Use Merge by Distance to clean up overlapping vertices.
• Check the mesh structure to ensure uniform topology.
4. Rendering Preparation
1. Material Setup
• Switch to the Shading workspace.
• Create a metallic material for the model, adjust the color to black, and tweak the roughness and metallic values for the desired look.
2. Lighting Setup
• Add an area light and position it at an angle.
• Increase its intensity and size for softer shadows.
• Use HDRI lighting to simulate realistic environment lighting.
3. Background and Camera
• Add a camera .
• Adjust its position and angle to center the model in the frame.
4. Render Settings
• In Render Properties, choose the Cycles render engine.
• Press F12 to render the final image.


Comments
Post a Comment